In the past I encountered issues with providing content updates to a Microsoft Teams Tabs application. This blog-post describes how to get rid of them.
As you might already know if you searched for this issue, it can be a hassle to provide updates to a teams application if the Cache-Control header isn’t set correctly on the website you provide as a tab in Teams. I already wrote a blog post on how to set the Cache-Control headers to no-cache for Azure Webapps, so if you are running the application there, please check that post out.
Hint: It is important to note, that in my experience, Teams doesn’t really care about the normal TTL of the cache: in an example I dealt with, the application was hosted on Azure Webapps, which has a specific TTL by default. But even after the TTL passed, the application somehow did not load the updated files from the Webapp and still displayed an outdated version of the application within Teams.
So my best guess as of now is to just set the Cache-Control header to no-cache to be absolutely sure that Teams loads the current version of the Tab-content at each visit to the Teams-App. I am sure you can search the Internet for guidance on how to do that in your hosting environment other than Azure Webapps.
On that point: please consider not using no-cache if your application is large or specific parts don’t have to be updated often. Caching of cause makes a lot of sense in most scenarios, so removing it completely might impact performance or other factors of your application you might not want to be affected. There is always a middle way of setting the Cache-Control to some reasonable time-out, excluding some files from caching only or to just life with the fact, that updates take some known time to arrive.
If you update you application only very little over time, doing Step 2 every now and again could also be a sufficient fix for you!
Then you don’t have to touch the Cache-Control headers at all.
If your Cache-Control was not set correctly before, you need to somehow tell Teams to re-load the content at least once - to get the new files and recognize the changes done to the response headers in Step 1. For this you can update the version number in manifest.json of your Teams Tabs application.
For a full reference to manifest.json, you can check out the schema reference at Microsoft. In short, see the snippet below to see where to change the version number:
{
    "$schema": "https://developer.microsoft.com/json-schemas/teams/v1.15/MicrosoftTeams.schema.json",
    "manifestVersion": "1.0.0",
    "version": "1.0.0", <--- CHANGE THIS ONE UP
    ...
}
Finally, in Teams admin center of Office 365, you can re-upload the application (or ask the corresponding Teams admin in your organization to do so). When a new version exists, Teams seems to download the contents of the tabs new, so you should be set from now on and any further updates should only require a click on the little refresh icon in the top bar of the Tabs application.
To check if it worked or if the issue still persists (or for any debugging of your tabs app really :D), you can use the developer tools of Teams (Teams is “just” an Electron app after all). To enable them, left-click up to 7 times the tray icon of Microsoft Teams. Then right-click it to open the context-menu. It should now look something like this:
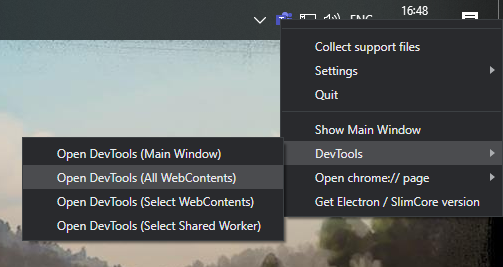
Choose “DevTools” and click on “Open DevTools (All WebContents)”. A bunch of typical Chrome DevTools will appear, you will have to find the correct one which contains your application. Here you can inspect your application if all changes are really there or if some caching issue persists.
basti-sk.com, since 2014 • Legal Notice
